
This is the beginning of a new series of articles on personal finance. In this series of posts, I want to show you how you can get an overview of your personal finances, your assets, and where your money is going. And you can do all of this without paying for additional software or services, just by using the spreadsheet software you already have.
As part of this series, you will not only learn how to manage your own finances, you will also learn a lot about spreadsheets, double-entry bookkeeping, and even some programming if you want to.
A Financial Journey
Many years ago, when I got my first job and started my family, I found myself asking a lot of new questions about my finances. I would look at my bank statement at the end of the month and, like many people, I would ask myself: Where did all the money go? Not only that, but also: Where can I save money? How much money will I have at the end of the month? At the end of the year? If I keep this up, when will I be able to buy a home? And how long will it take me to pay off the loan?
All of these questions led me to explore a simple idea that is almost a millennium old, but still very relevant: double-entry bookkeeping. Using this method and my spreadsheet software, I was able to start answering my own questions. Once I learned the basics of double-entry bookkeeping, I started recording all my transactions, and based on that, I could understand where all the money was going. I was also able to plan ahead and take control of my finances. Over the years, I learned how to do all of this in my spreadsheet software. In the process, I discovered my own financial patterns, learned from my own mistakes, and made better and better projections so that I could make financial decisions with more confidence.
In this series of articles, I want to show you how you can do the same.
The Tools of the Trade
All you need to keep track of your finances is a spreadsheet program.
For this article, I will use Apple Numbers. Why not use Microsoft Excel? That’s easy, because I have an Apple laptop. But all the calculations in this article use very simple formulas that will work in Excel and probably any spreadsheet application like LibreOffice Calc or Google Sheets. I have not tried them, but if you use them, please leave a comment and let me know how it works for you.
Why not use some off-the-shelf financial planning software? After all, there is plenty of software available for doing your own finances, such as GnuCash (free and open source) and many commercially available software packages and online services. For me, the reason was this: When I started my journey of taking my finances into my own hands, I tried several of these software packages. But I was never really happy with what I got. In each software, I could do double-entry bookkeeping and keep all my accounting records in the same database. But I could never do all the calculations and forecasting that I wanted to do and the way I wanted to do it. I like to do my finances not only to get an overview of where I am, but also to make predictions for the future, to do case studies, to write down why I bought or sold a stock at any given time, and much more. There was not a single program I tried that could really satisfy my needs, and I spent some money and came to the conclusion that all I really needed was my spreadsheets. After all, accounting, which is at the heart of all financial planning, is just addition and subtraction in spreadsheets. And that is what spreadsheets are designed to do.
At first, I was intimidated by the prospect of learning double-entry bookkeeping. After all, this is what accountants do, and they study it for years. But when I started digging into the subject with a book from the For Dummies series, I learned that it is actually quite simple. All you need to know is a few types of accounts and how to decide for each accounting entry what goes on the debit side and what goes on the credit side. Once I got the hang of it, it was really very easy. And I have no doubt that you can learn it, too!
Of course, there is a lot more to what accountants do, but that is mostly because they have to keep a company’s books in order and meet all the legal requirements. But I was only interested in getting my own finances right, so no one will judge me if I fail to follow the latest IRS rule change.
A nice side effect of doing my own double-entry bookkeeping is that I now understand what public company financial statements mean. I can read balance sheets and understand what a cash flow statement is. By the time you finish this series of articles, I am sure you will, too.
Your First Accounting Entry
But enough talk. Let’s start with an example.
In this first step, we will keep it very simple. I will also use as little theory as necessary and introduce it as we go along.
In this article we will assume that you are a smart kid and want to get an overview of your finances. A child’s finances are a good place to start because there are not that many sources of income and also no complications like debts and liabilities (hopefully).
As a child, you have one source of income: Your parents’ pocket money. You get it in cash every week.
You like to spend your allowance on candy and toys.
You started your financial plan last week, and now you want to see how much money you have left.
With these facts in mind, how do we begin the process of setting up your books? The first step is to think about your accounts. Accounting is all about accounts. The first account you need is the most obvious: Your cash. The cash account shows you how much money you have right now.
We record all the money that comes into your cash account (pocket money income) and all the money that goes out (candy and toy expenses). The list of entries is the basis of double-entry accounting, so we will start with that.
Let’s look at your first entry: The allowance you received last weekend:

This entry shows all the principles of an accounting entry: First you have a date and a text that describes what kind of transaction happened or why. Next come the two parts that give double-entry accounting its name: the debit side and the credit side. You always have these two sides for each entry, which is why it is called double-entry accounting. Which is which, and why these names? It is not really important. What is important is that you follow these conventions:
- Each entry has both a debit and a credit side. The credit part is always on the left, the debit part on the right.
- The amounts on both sides must be equal.
- The debit and credit accounts must be different.
Now, in your first accounting entry, we see that we already have the debit side, your cash account. Why is it on the debit side and not on the credit side? More on that in a moment. We also have part of the credit side. According to the second rule, the amount here must be the same as on the debit side, which is $10.00. But which account should we use?
The answer introduces another central concept of double-entry accounting: There are different types of accounts. These accounts do not differ physically or mathematically, only in the convention of how we use them in double-entry accounting, and in when they appear on the debit and credit sides.
The Cash account is an asset account. This is the type of account you are used to if you have a bank account, but it can represent other things you own. This can be cash, a bank account, land, buildings, inventory, and many other things. But right now you are just a child, you do not have any bank accounts or inventory, but you can have one type of asset account: Money in your pocket.
More Accounts
Now comes the other side. We need to create a new type of account here called the revenue account. This type of account is for any source of income you have. This is not an account that exists in physical form somewhere, like a bank account or cash. It is just a bookkeeping account that helps you figure out where your money is coming from and where it is going. This may take a little getting used to, but I am sure you will get the hang of it in no time if you follow along.
Right now you only have one source of income, your allowance. So let’s put that on the credit side:

You would read this to yourself as “On June 3rd I got an allowance from my parents. I got $10.00, which went into my cash account, and I recorded it as coming from pocket money.
Congratulations, our first accounting entry is complete and follows all our rules. Hurray!
You may be wondering why the Cash account is on the debit side and the Pocket Money account is on the right. Why not the other way around?
The short answer is: It is the way it is. You just have to accept it as a given. Students of accounting need to know the rules by heart, but for you as a practitioner at home, it is enough to be able to look them up when you need them.
Each type of account has its own rules for when it appears on the credit side and when it appears on the debit side. For asset accounts, when you have money coming in, they appear on the debit side, and when you have money going out, they appear on the credit side. You will learn these rules by example in the next articles, but if you want to read them in detail, you can find them in any beginners book for accountants or just on Wikipedia.
As I said in the beginning, you like to spend your money on toys and candy. The day after you got the money, you went to the candy store around the corner and bought two candy bars for $1 each. You would record this transaction as:

Here you can see two new things: The Cash account is now on the credit side. As I said before, the rule for asset accounts is that when money goes out, it goes on the credit side. And since you are giving away your money in exchange for two candy bars, you now have less cash, so it is a cash outflow.
The second new thing is that we have a new account that appears on the debit side: The Candy account. This is an expense account. This is like an income account, only in reverse, for all the things you spend your money on. The rule here is that when you spend something, the corresponding income account increases, and that goes on the debit side. Again, something you will get used to eventually.
So far we have seen three types of accounts: asset accounts, income accounts and expense accounts. There are five types of accounts in total, but we will not need liabilities and equity accounts just yet. But believe me, they are not really different, and once you understand the first ones, the rest will explain themselves almost by themselves.
Now I have to tell you one more thing: Remember our rule 3 from above, where I said that for each transaction, the two accounts must be different? That is only half the story: not only must the two accounts be different, but their types must be compatible. There are some types of accounts that go well together and others that don’t. For example, you can always combine income or expense accounts with asset accounts, because money can come in or go out, and the asset account is the source or sink of that money flow. You can also combine different asset accounts because you can take money out of your bank account as cash and put it into your cash account, or vice versa. But you cannot combine expense and income accounts. Something cannot be both an expense and an income at the same time, those kinds of transactions have to touch an asset account first. I hope this makes some logical sense to you.
Everything in the Balance
OK, now that we have the basics of accounting entries out of the way, we are already halfway through understanding double-entry bookkeeping. The next part is to answer the question of how much money are you going to have left over at the end of the week? The answer comes from creating a balance sheet. How do you do that?
First, let’s make our example a little more interesting by recording all the other purchases you made last week:
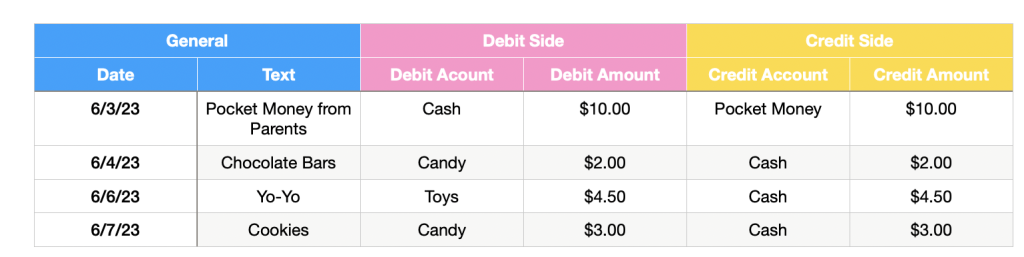
As you can see, you spent a total of $9.50 on candy and toys over the course of the week. This should leave you with $.50 at the end of the week, since you started with $10.00.
How do you get this result using double-entry accounting? The answer is: We create a ledger account. A ledger account looks like this: You have the sum of all debit entries on the left, and the sum of all credit entries on the right:
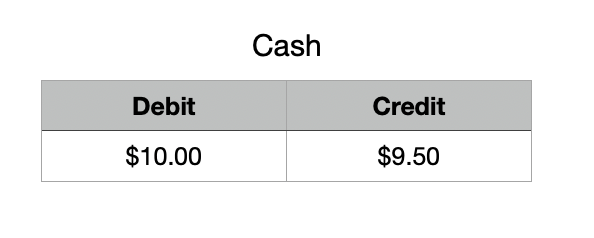
In other words, for the Cash account (or any other asset account), the debit side represents all the income you had during the week (your allowance). The credit side represents all the money that went out of your Cash account during the week. In this case, it all went to expenses, but it could also go to other types of accounts, such as a bank account, a loan to a friend, etc. It does not matter to your ledger account, and that is the beauty of double-entry bookkeeping: By following a few simple rules when recording your transactions, you can easily see both how much money (and liabilities) you have, and where it all came from and went to, just by creating the appropriate ledger accounts.
How much cash do you have left? We can get the answer by subtracting the credit side from the debit side. We call this the balance.
Here is our first formula. It is as simple as it gets.
Just put your cursor in the cell where you want the balance to go, press “=” and the formula editor will open. First click on the cell that says $10.00, then type a minus sign, then click on the other cell. Then press Enter and voila, you have your balance.
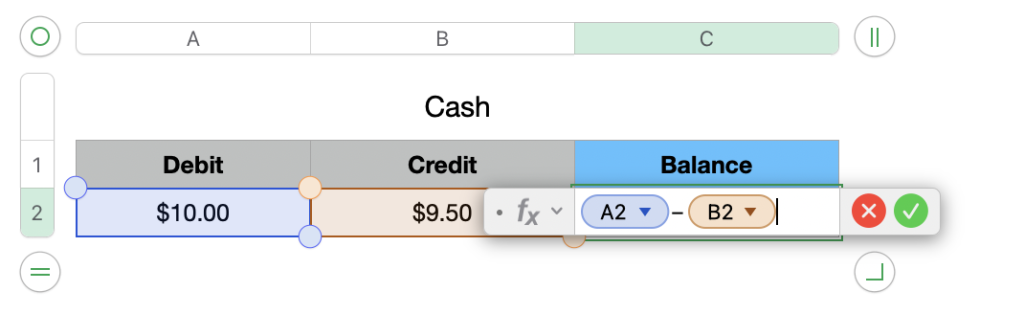
It is $.50, exactly what we had calculated. We are on the right track!
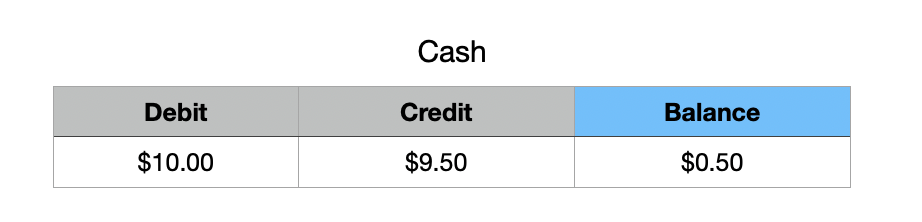
Note that unlike transaction records, the balance of an account is usually not 0, and there is no general rule about its value. The only rule is that the balance is calculated by subtracting the credits from the debits.
So now you know that you have 50 cents left at the end of the week. A quick look in your wallet should confirm this. If not, you have either been sloppy in recording your transactions, or you have lost the money somehow.
We can do the same for our other accounts, not just the Cash account. Let’s take a look at your candy expense account:

The candy account appears on the debit side only. The total amount of your Candy purchases is $5. The purchases all appear on the debit side, so your candy account balance is positive by $5. This way you can easily see how much money you spent in each category.
But wait, you actually paid money, so why isn’t the balance negative? The answer is that the sign of the balance does not really have a general meaning, it depends on the type of account. So when looking at any ledger account, you need to know what debit and credit mean for that type of account and how to interpret a positive or negative balance.
OK, that’s it! You have mastered the basics of double-entry accounting. You know about transactions and ledger accounts. And that is all you need to know to understand and use it all. Everything else that follows in this series of articles is just an extension of those basics.
Automating Your Calculations
As you have seen, all the math we have used so far is just addition and subtraction. And it will stay that way. This means that you could do all of this by hand if you wanted to. And actually, this is what people have been doing for centuries, as double-entry bookkeeping has been in use since the 11th century.
But I promised you that I would show you how to automate this process. After all, that’s what computers are for, right? So here we go.
All we need is another formula that comes with Numbers (but also with Excel). What is this formula supposed to do for us? Let me explain it in plain text first: “I want to calculate the debit side of my cash account. For this, I want the sum of all transactions on the debit side where the debit account is Cash.”
In other words, I want the sum of all numbers in the column “Debit Amount” where the text in the column “Debit Account” next to it is “Cash”. This is what the “sumifs” formula does.
Numbers explains the formula like this:
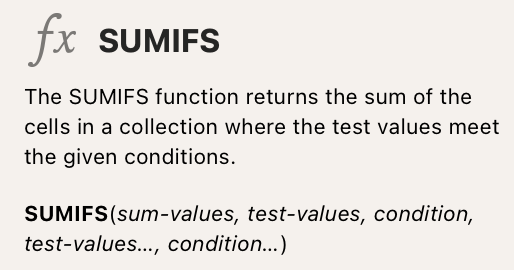
The sum values are the values we want to sum if the next condition is true. Here we put the column “Debit Amount”. *Test values are the values we want to check the condition for. In our case, this is the column “Debit Account”, because we want to calculate the total only for entries where this column has a certain value. And this value is specified under condition, in our case the condition is that the value in test values is equal to “Cash”. You could add more conditions, that is what the following parameters are for, but they are optional and we will not use them. We will only use the three mandatory parameters at the beginning.
Let’s see what this looks like: First, enter the cell where you want the debit amount to go. As the value, you type “=” again and the formula editor opens. You start by typing “sumifs” and an opening parenthesis. Then you select the column “D” in your transactions table:
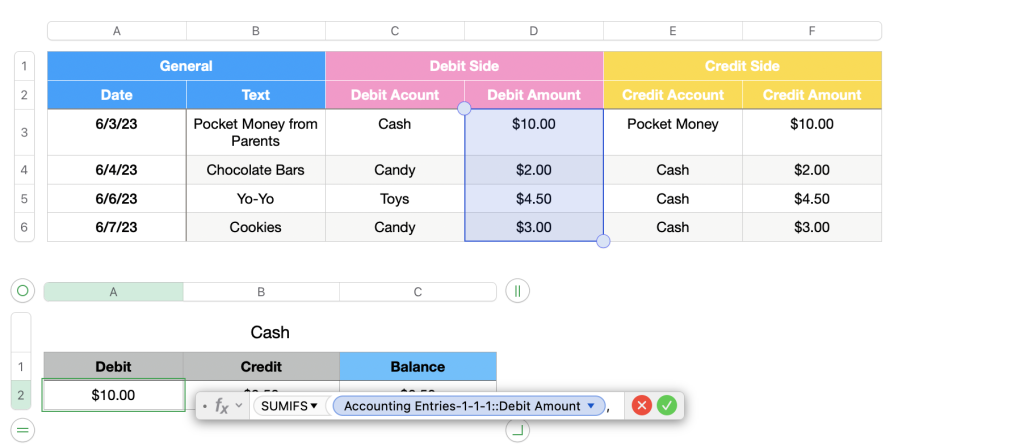
This brings in this column as the first parameter, the amounts we want to sum if the condition is true for them. Then you move to the next parameter by entering a comma. Then you click on column “C” to get the test values. Then another comma, so that as a last step you enter the condition to be checked, in this case just the string “Cash” (with quotes). Then you enter a closing parenthesis and confirm the formula by pressing Enter.
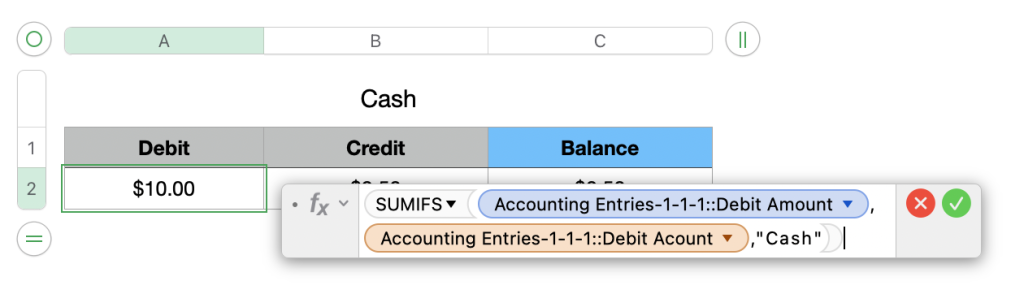
If you did everything correctly, you will get the same result as before, $10.00.
(As an Excel user, this would work almost the same for you. Only in Excel, you cannot just click on the column header to get all the values in that column, you have to manually select the range of values in the column. The selection also does not automatically grow as the table grows, so you have to adjust it from time to time. This is a feature I miss whenever I use Excel and a reason why I prefer Numbers.)
Of course, we can use the same formula for the credit side. We just have to use column “F” for the sum-values and column “E” for the test-values. The condition remains the same:
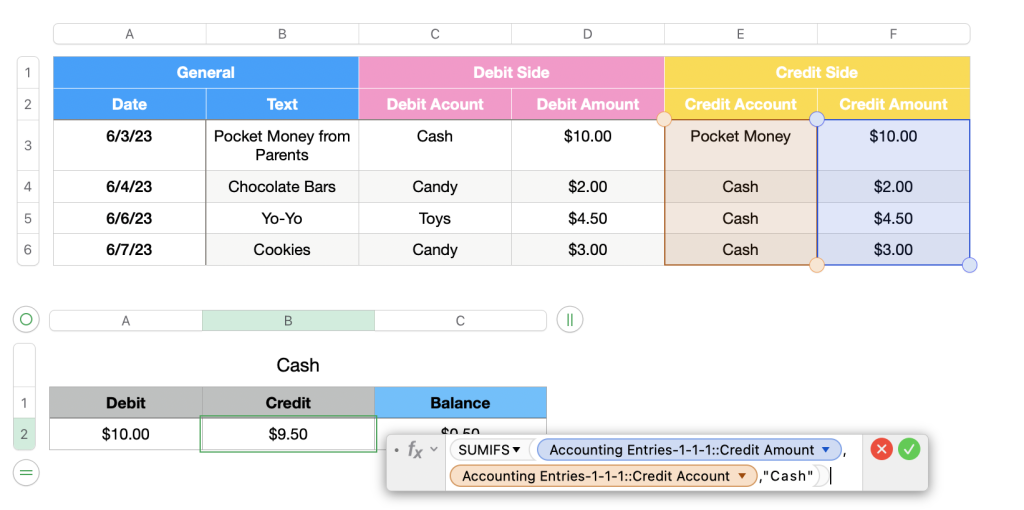
Now we have our computer calculating the ledger account for us.
When you add another transaction, it automatically updates the credit and debit values, which in turn updates the balance. This way, you can always keep track of your accounts by simply adding your transactions to the list.
What’s next?
You did it! You have mastered the basics of double-entry bookkeeping and learned how to get your computer to do it for you.
The following articles in this series will show you how to build on these basics to create your own balance sheets, profit and loss statements, cash flow projections, and much more.
In the next article, I will tell you about balance sheets, and we will also learn about the other two types of accounts we have not seen yet. Stay tuned!
One reply on “Taking Control of Your Finances. Part 1: Bookkeeping in Spreadsheets”
[…] return to the example we started with in the first part of this series. In this scenario, you are a kid with a cash account and income from your parents’ allowance. […]